Bluetooth and Wireless Support
Santroller configurator allows using the Pico W to create wireless guitars. You can use a single Pico W with a PC or phone, or you can use a second Pico W as a bluetooth receiver to get console compatibility. Note that once this is done, USB still works, so you can still use a guitar over USB if the battery dies or you want the better latency that wired provides.
There are fake Pico W boards out there that are NOT supported by santroller. If you see an ESP based wireless module on the listing for your Pico W, do NOT buy it.
There are fake Pico W boards out there that are NOT supported by santroller. If you see an ESP based wireless module on the listing for your Pico W, do NOT buy it. Programming and configuring only works over USB. If you are designing a controller around this, make sure that the USB port is still accessible.
Wiring a battery
The simplest way to safely add a second power source to Pico is to feed it into VSYS via a Schottky diode. This is necessary as it means the USB voltage won't feed back into your batteries, since the batteries and USB run on different voltages. Internally, there is another Schottky diode on the pico to prevent the batteries from feeding back into the USB pins.
For picking a Schottky diode, all that matters is that it can handle the current demands of your application, and that it has a >10V maximum reverse voltage. A 20A diode would be more than enough and these are pretty easy to find.
If you intend to use a rechargable battery and have the USB port charge it, there are various products out there that can add battery charging support to the pico, that come with the necessary electronics required to support both charging and data over a USB cable.
Programming a Bluetooth Transmitter
- Follow the standard guide to set up your inputs.
- Expand
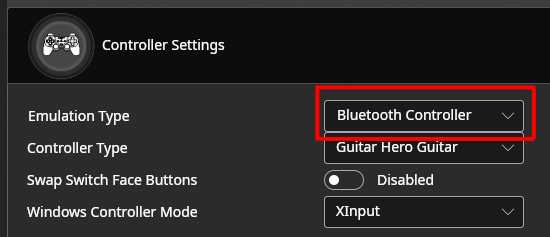
Controller Settings, and set theEmulation TypetoBluetooth Controller
- Hit Save Settings
Programming a Bluetooth Receiver
- Program a Transmitter using the above guide, and keep it plugged into a power source.
- Plug in your Pi Pico and open the configuration tool. It should show up as an unprogrammed device, if it does not, unplug the Pico, hold bootsel, and plug it back in.
- Set the
Input TypetoBluetooth Receiverand hitConfigure - Once initial configuration is done, hit
Configureagain. - Expand
Controller Settings, and set theController Typeto the sameController Typeused in the transmitter. - Expand
Bluetooth Inputand hitStart Scan - Find your transmitter in the
Selected Devicedrop-down, and then hitSave Settings
Sleep Mode
You can turn on the Sleep when wireless after inactivity setting to enable sleep mode. With this enabled, after Sleep Mode Timeout (Seconds) has elapsed, the pico will go into a deep sleep mode, and can only be woken up by pressing the button connected to the wakeup pin.
Authentication
If you wish to use your receiver on a console that requires Authentication, the USB Host needs to be set up on the receiver end, not the transmitter.