Using the Santroller Configurator
The Santroller Configurator is a tool that can program any micro controller with the Santroller firmware.
Getting started with the Configurator
- Open the Configurator. If this is your first time using it, it will need to extract some libraries and this may take a little bit.
- Plug in your microcontroller.
- Choose an
Input Typeto load the firmware with a sensible default configuration.- Directly Wired
- Wii Adapter
- Choose this if you are following the Wii adapter guide.
- PS2 Adapter
- Choose this if you are following the PS2 adapter guide.
- USB Adapter
- Choose this if you are following the USB adapter guide, and just want to use this for USB inputs.
- Bluetooth Receiver
- Choose this if you are following the Bluetooth receiver guide.
- Peripheral Device
- Choose this if you are building a Peripheral.
- You will need to set your SCL and SDA pins on the peripheral that are connected to the main controller. This is the pins being used on the peripheral end, not the main controller end.
- Hit
Configure - Wait for the initial configuration, and then hit
Configureagain. - You will now be at the main screen of the tool. From here, you can configure every option of your controller.
The main screen
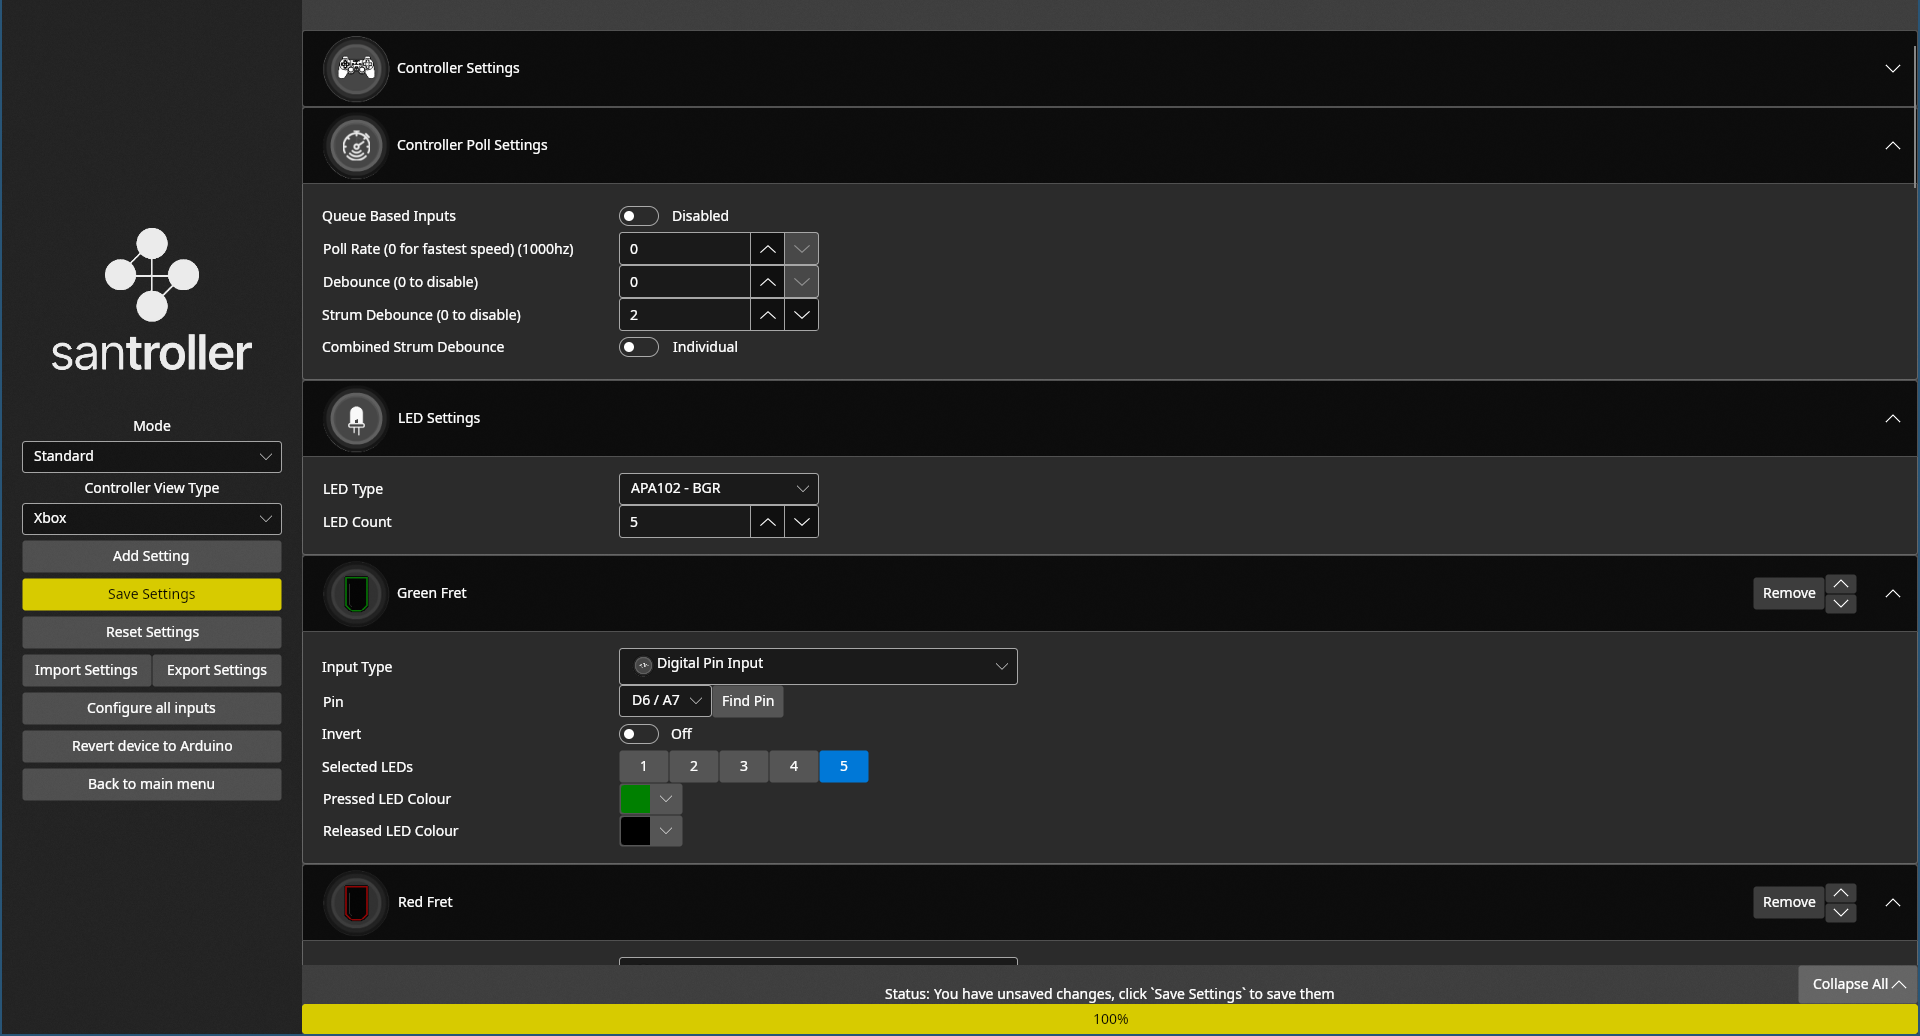
After your device is running the Santroller firmware, configuring will land you at the following screen. There is a sidebar to the left, and your settings to the right.
The Sidebar
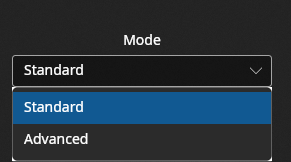
Mode
You can change the mode between Standard and Advanced. For most people, the standard mode will be sufficient, but the advanced mode allows for configuring debounce on a per input level, and allows for configuring the pin mode of individual inputs, which allows for changing the direction pins are pulled. Note though that with advanced mode enabled, queued inputs won't be available, as individual polling and queued inputs aren't compatible with each other.
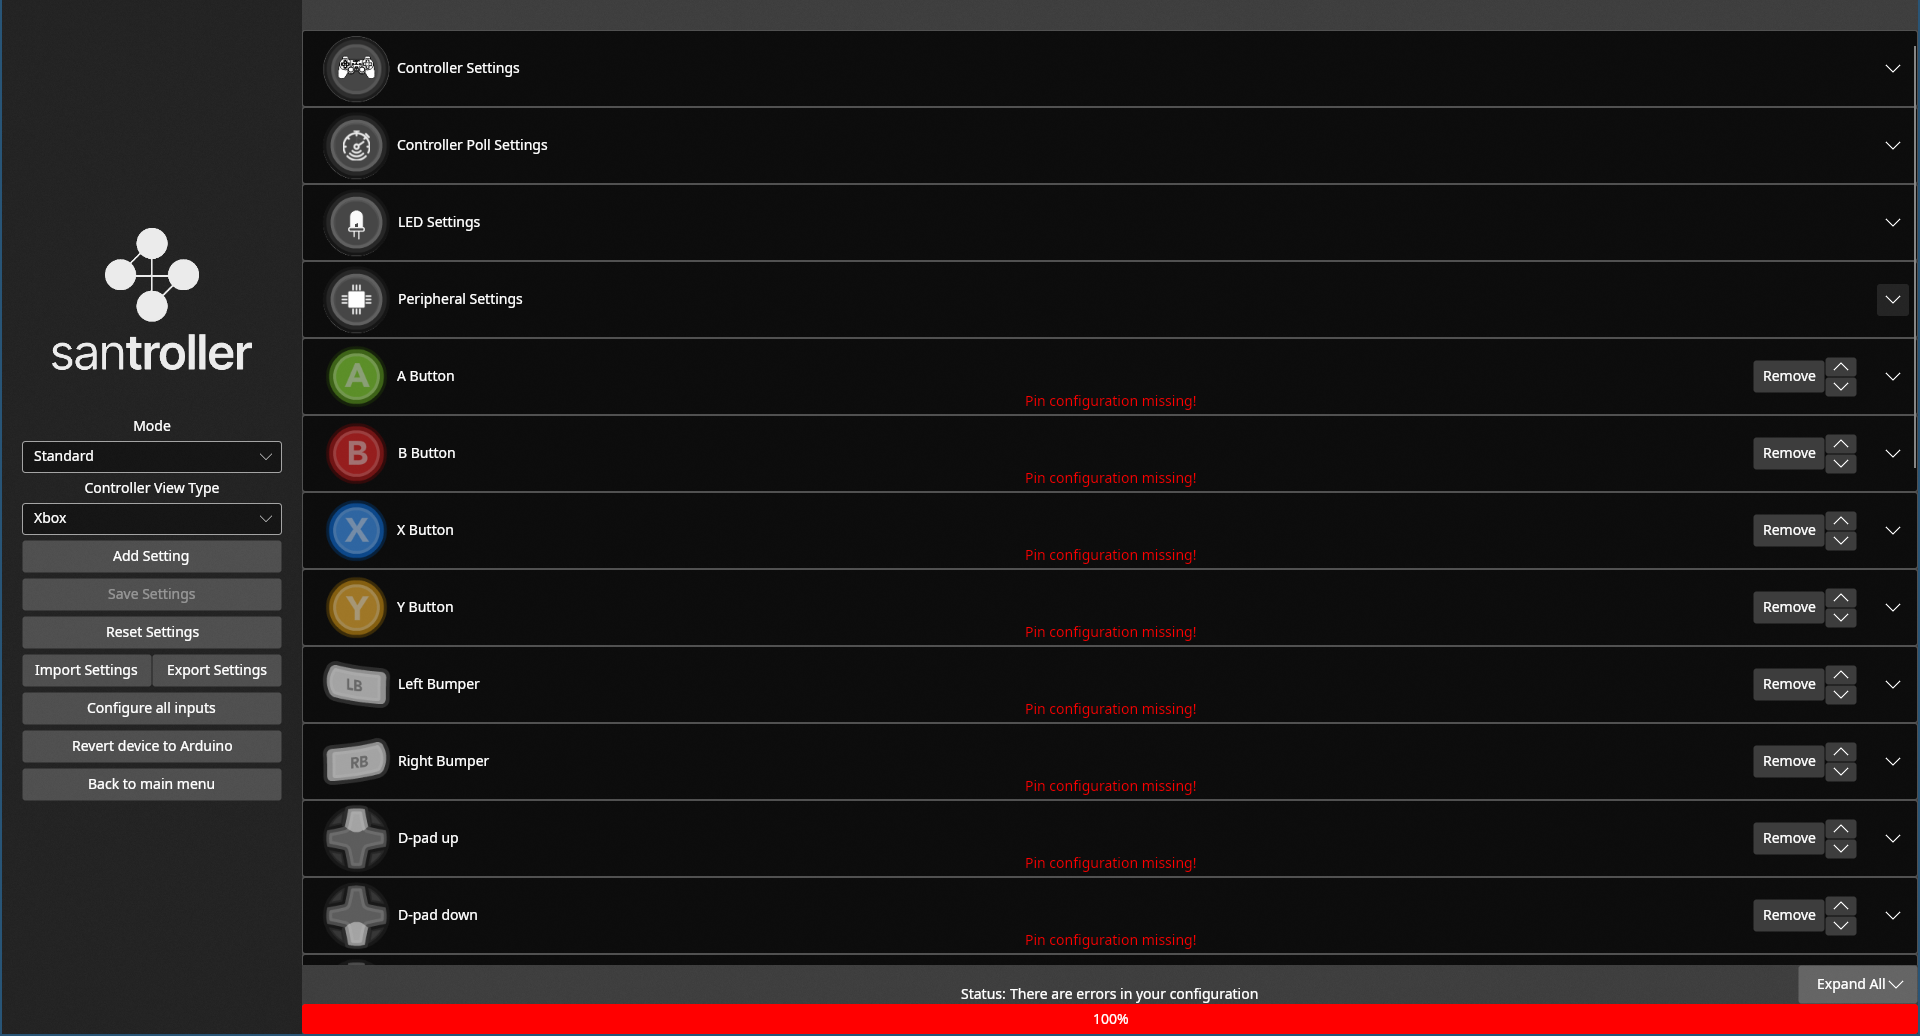
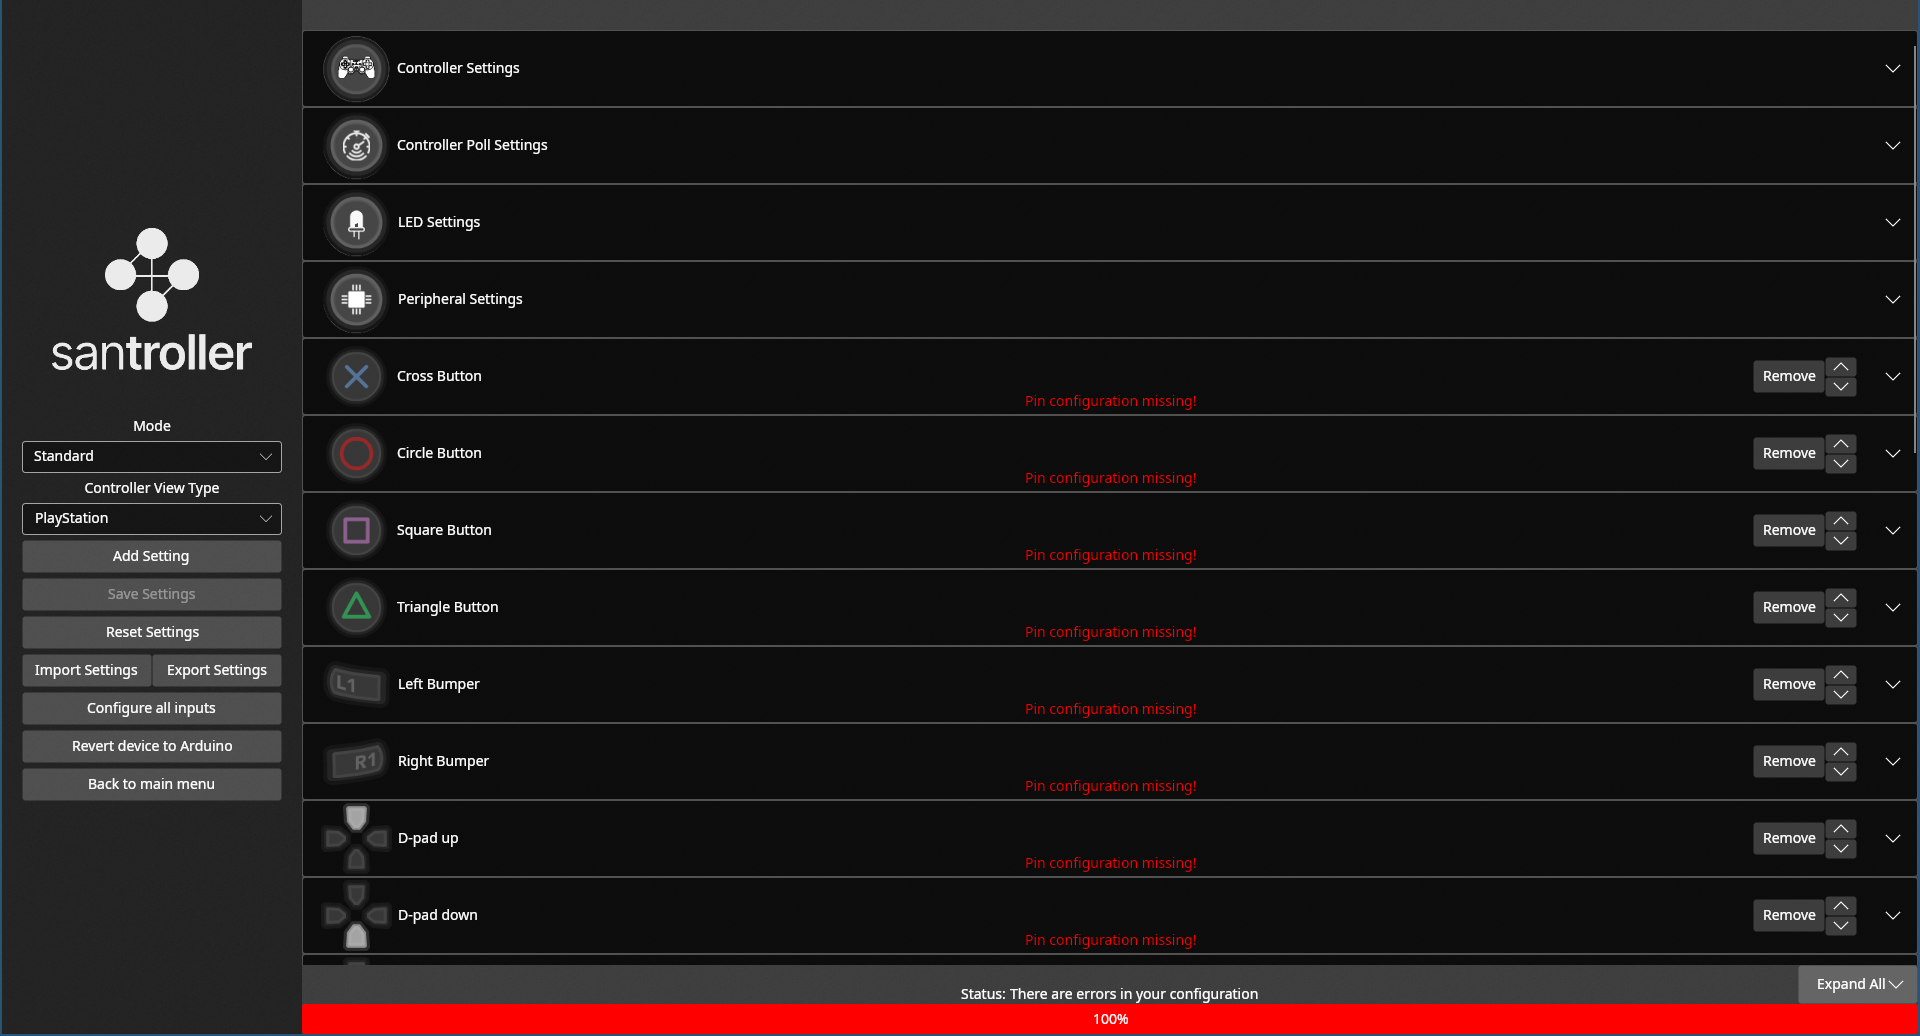
Controller view type
As this tool can be used to configure controllers that work on a variety of consoles, you may want to view your inputs for a specific console. This setting allows for this, and allows for picking between Xbox, PlayStation and Switch.
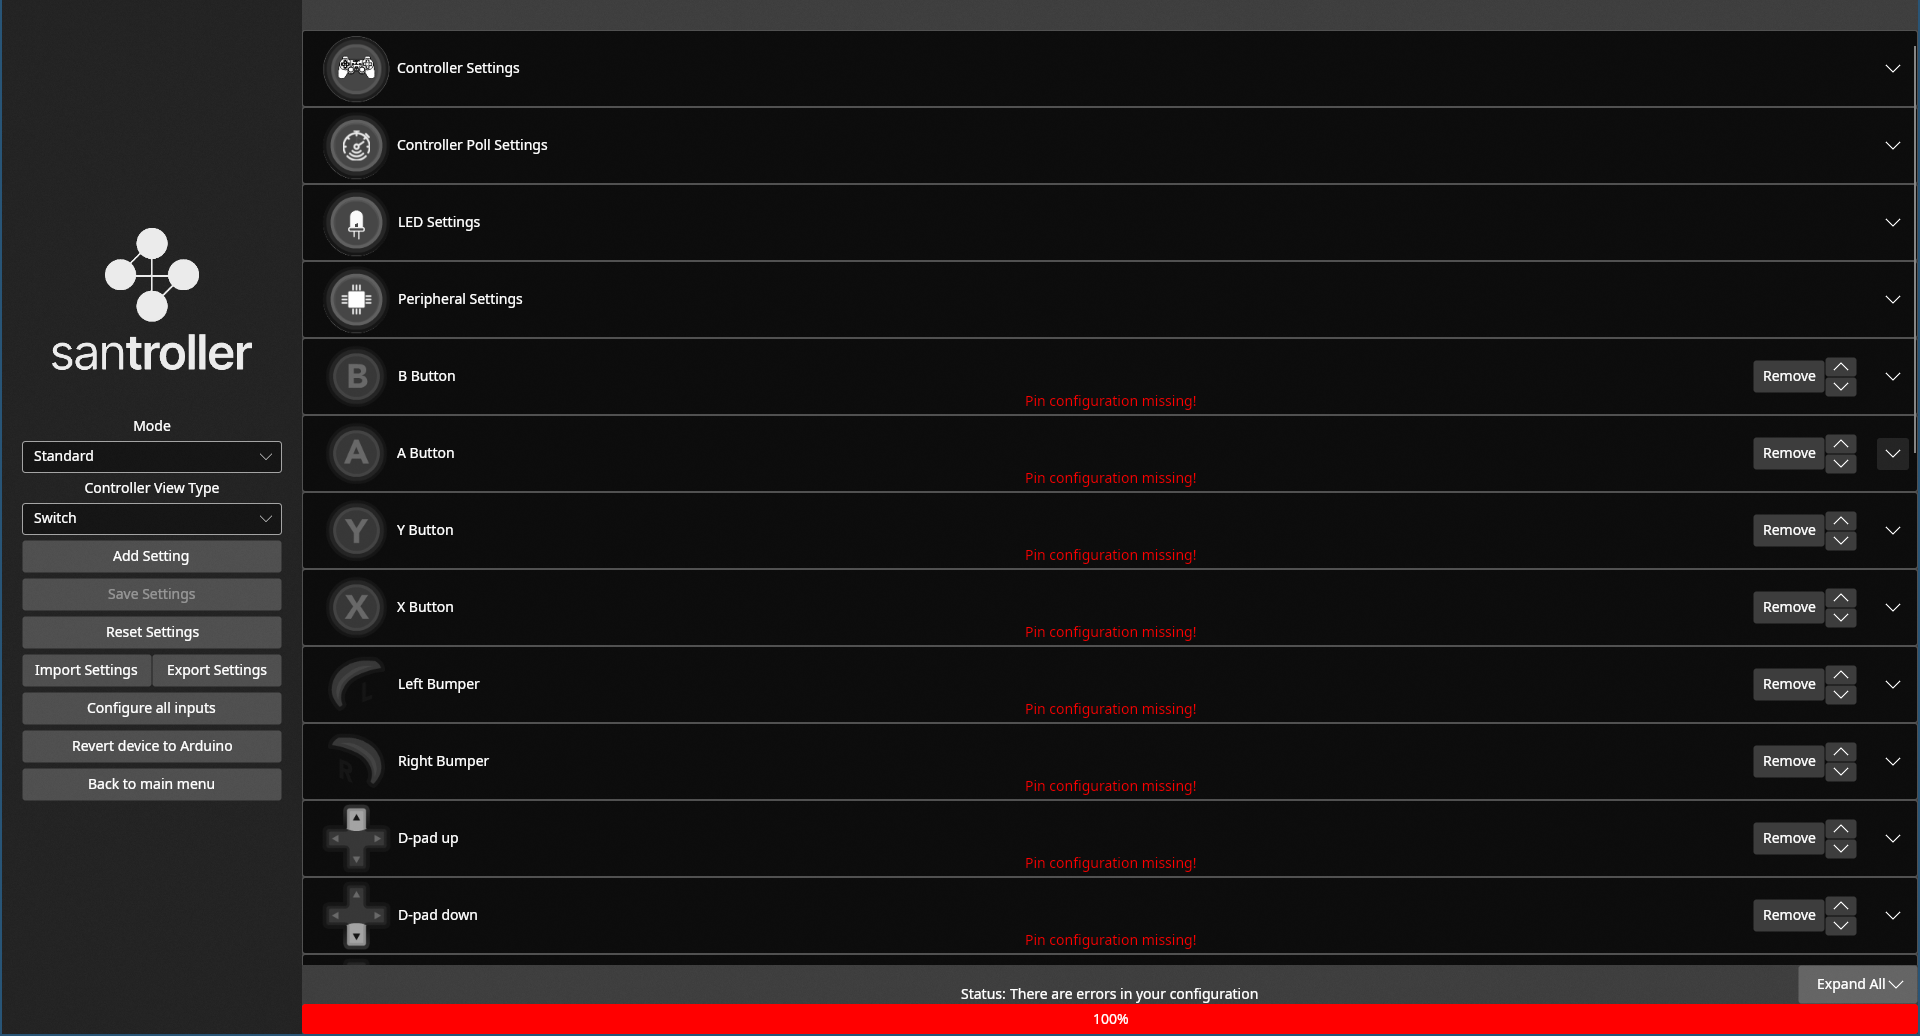
Add setting
This allows for adding a setting, such as a input to emulate, or a LED. Settings will be explained further down in the guide.
Save Settings
This button will save all your changes to your controller, as long as your settings are valid. It will glow yellow if there are settings that have not yet been written.
Reset Settings
This button allows for clearing all settings, or resetting to the default set of settings for a given controller type.
Import / Export Settings
This button allows for saving your settings to a file, and then loading them back.
Configure all inputs
This button will take you through each input setting in the list, and let you pick each pin by pressing the button on your controller.
Revert device to Arduino
This button will reset your device to a state that is recognised by the Arduino IDE.
Back to main menu
This button will take you back to the main menu. Any changes that have not been saved to the device will be lost.
Settings
Settings are the heart of this configuration tool. There are various settings that will let you configure a controller to do exactly what you want, and these settings will tell the firmware what inputs you have, and how you want them to work. By default, settings are collapsed, and clicking on a setting will present you with all options that can be configured for that setting.
Adding a setting
If you click the Add setting button in the sidebar, you will be presented with a dropdown, that lets you pick the setting you want to configure.

Types of settings
Controller settings

The controller settings allow for configuring various aspects of your controller.
Emulation Type
The Emulation Type allows for stating what type of device is being emulated, and this allows for changing between controller emulation, keyboard emulation, bluetooth controller emulation (on the Pi Pico W) and bluetooth keyboard emulation (on the Pi Pico W).
Controller Type
The Controller Type allows for specifying the type of controller you want to emulate. This is how you tell the tool if you are emulating a Guitar, Drum Kit, or various other types of peripherals.
Rollover Type
Keyboards can work in multiple different modes. 6KRO is the standard, and this allows for pushing up to 6 keys at once. This report is smaller due to it only allowing 6 buttons simultaneously, and so it is more compatible with some consoles. NKRO mode allows pressing any combination of buttons at once, and works a lot like a game controller with a lot of buttons. This makes it quicker to process but it does not work on the PS4 or PS5.
Swap Switch Face Buttons
The Swap Switch Face Buttons option is only used when your controller is plugged into a nintendo switch. This dictates if the switch mappings are based on the face button legends, or the face button position, when compared to an xbox or playstation controller. When this setting is off, buttons are laid out by position, so the A and B buttons, and the X and Y buttons are swapped around so that the mappings make sense from a xbox controller perspective. If you would rather this was not the case, turning this setting on will instead map the buttons so that the legends are aligned instead of the button position.
Windows Controller Mode
The Windows Controller Mode option is used when a controller is plugged into a Windows PC. When set to XInput, the controller will present itself as a XInput device, but when set to HID, it will present it self as a HID device. Note that this is only applicable for USB, Bluetooth will always use HID mode.
Controller Poll Settings
This setting allows you to change your debounce settings, and your poll rate. You can also enable Queue based inputs here too. This setting will poll your inputs as fast as possible, and then it will put them in a queue and send them to your device at the dictated rate. This means that the console or PC you are connected too no longer has to poll your device at max speed, as you can now enter inputs and they will be queued until the next queue period. This feature however is only available for controller based guitars, however it is not available for fortnite festival guitars as those internally work like keyboards, and keyboards work differently enough that queued inputs are harder to implement.
LED Settings
RGB LEDs (APA102)
If you have followed the RGB LED guide, then set your LED Type to APA102 here. Note that different manufactuers have their APA102s work with colours in different orders, so if you find that colours you pick in the tool are totally different to what you see on your LEDs, then you have probably picked the wrong colour order. On the Pi Pico, you can also assign the pins for your LEDs here as well. You can set how many LEDs you have connected here, and then when configuring buttons, axis' or LED commands later, you can pick which LEDs to bind them to, and which colours these actions should drive the LEDs with.
LEDs with Driver (STP16CPC26)
If you have followed the LEDs with driver guide, then set your LED Type to STP16CPC26 here. You can then assign the pins being used by your LED drivers here. You can set how many LEDs you have connected here, and then when configuring buttons, axis' or LED commands later, you can pick which LEDs to bind them to.
Peripheral Settings (Pi Pico only)
This firmware allows using a secondary Pi Pico as a peripheral. This means you can connect two picos together using 4 wires, and forward inputs and LED information between them. This can be used to add LEDs or faster inputs when using connections with very few pins, for example this can be used to add LEDs to a GH5 guitar hero guitar neck, or LEDs to a DJ Hero turntable. Once this option is switched on, you will see peripheral versions of the digital and wt neck inputs. Set the SCL and SDA pins you have connected to the peripheral controller. Here you pick the pins being used on the main Pico, not the peripheral one.
Buttons
For buttons, you can pick the input type, in order to map an input from any supported device to this output. You can then also pick if you want the input inverted before it gets mapped to the output. The icon for the button will light up when the input is activated, which gives you an easy way to test if your input is working. If you use an analog input here, then you can dictate a threshold that needs to be reached before that input is considered activated. If you have APA102 LEDs enabled, you will be able to pick the colour used when the input is triggered, or when it is not triggered. You can also select which leds in the chain will be updated by this input.

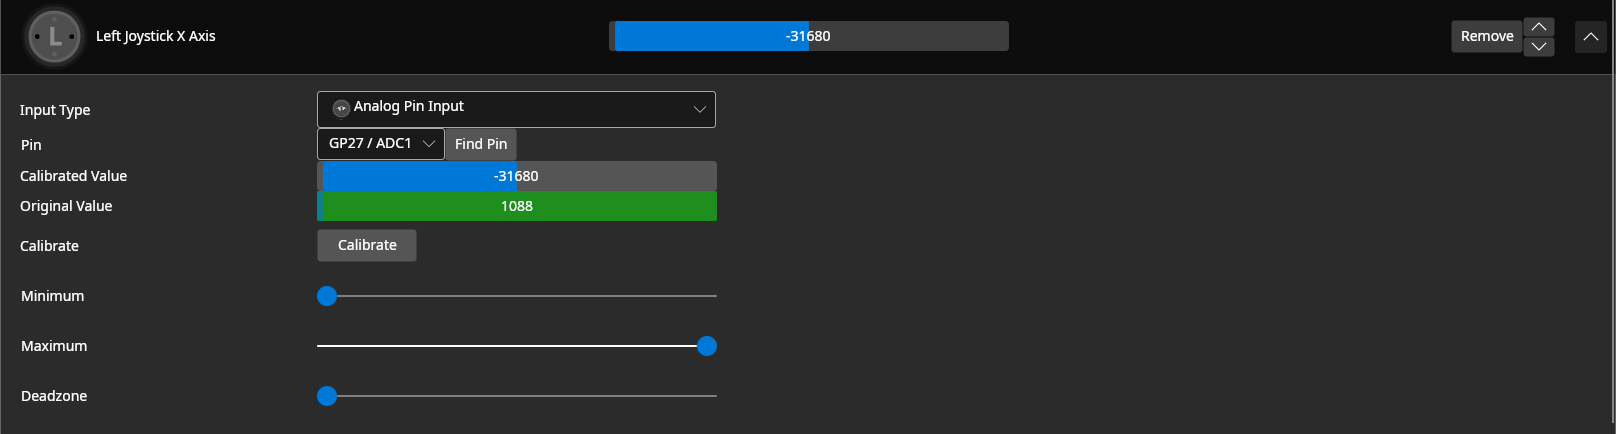
Axis
For axis, you can pick the input type, in order to map an input from any supported device to this output. You will then be able to see the raw and calibrated values from your analog input live. You can then hit the Calibrate button to calibrate your input. Follow the instructions and this will allow you to calibrate the raw values. You can also manually change the sliders to fine tune your calibration manually. For triggers, there is also a Digital Threshold. Some controllers represent triggers as digital values, so this is the value that your analog axis needs to cross before the digital signal is sent to the console. If you map a digital input here, you can instead just specify what value that digtal input will represent when triggered. If you have APA102 LEDs enabled, you will be able to pick a active and inactive colour. The controller will smoothly transition from inactive to active depending on the state of the analog input. You can also select which leds in the chain will be updated by this input.
Drums
For drums, you can pick the input type, in order to map an input from any supported device to this output. You will then be able to see the raw and calibrated values from your drum pad live. If you are using an analog input for the drum, look at the calibrated value of the drum. if you hit the drum pad, and other pads change, then bump up the minimum value until only the correct pad shows values. Essentially, you want to adjust the minimum value so that your drum isn't so sensitive that it triggers when you don't want it to, but you also don't want it so high that it drops light taps. Then, you can set the maximum so that a hard drum hit has the calibrated value go to the end of the bar. If you map a digital input here, you can instead just specify what value that digtal input will represent when triggered. If you have APA102 LEDs enabled, you will be able to pick a active and inactive colour. The controller will smoothly transition from inactive to active depending on the state of the analog input. You can also select which leds in the chain will be updated by this input. It is recommended that you enable debounce, as the drums use this for debouncing both the analog and digital values, and drums will bounce a lot.
Wii Extension Inputs
This setting will map a bunch of sensible bindings for various Wii extensions, such as the guitar, drums and nunchuk. Note that when this is added, you will not see any data from it until you hit save. For the Pi Pico, you can pick your SDA and SCL pins here. The Wii Inputs to display below dropdown allows for filtering out which inputs will show in this list. This allows for making it easier to find an input you may want to configure. This does not change what inputs are programmed and usable, only what is currently displayed. You can disable an input here if you don't want it to function. This can be used to disable buttons that you do not want to use, for example if you have disconnected the joystick on a wiitar, you can disable it here so that it doesn't send phantom inputs.
PS2 Controller Inputs
This allows for configuring PS2 Controller Inputs. Note that if this setting has just been added, you won't see any data coming from it until you hit Save Settings. For the Pi Pico, you can select your Command, Data, Clock, Acknowledge and Attention pins here. The PS2 Controller Inputs to display below dropdown allows for filtering out which inputs will show in this list. This allows for making it easier to find an input you may want to configure. This does not change what inputs are programmed and usable, only what is currently displayed. You can disable an input here if you don't want it to function. This can be used to disable buttons that you do not want to use, for example if your PS2 guitars tilt is broken, you could disable that here to stop it from sending phantom inputs.
USB Host Inputs (Pi Pico only)
This allows for configuring USB device Inputs. Note that if this setting has just been added, you won't see any data coming from it until you hit Save Settings. You can pick your D+ pin here. Due to how the implementation works, the D- pin is automatically set to the next pin, as the pins need to be next to eachother. You can also see any devices that have been detected by the usb port. Note that only a few rhythm game controllers, first party gamepads and xbox 360 controllers are supported at the moment. You can disable an input here if you don't want it to function. This can be used to disable buttons that you do not want to use, for example if your gamepad has an input you don't want you can disable it here.
GH5 Neck Inputs
This allows for configuring GH5 Neck Inputs. Note that if this setting has just been added, you won't see any data coming from it until you hit Save Settings. For the Pi Pico, you can select your SCL and SDA pins here. You can also pick if you want the Slider to map to standard frets, or if you want to disable the normal frets because you have hardwired them. You can also disable the slider outright here as well.
GHWT Neck Inputs (Pi Pico only)
This allows for configuring GHWT Neck Inputs. Note that if this setting has just been added, you won't see any data coming from it until you hit Save Settings. You can select your Input, S0, S1 and S2 Pins. Once you have the pins set correctly, you will see the raw value from each pad. The threshold dictates how much the raw value needs to increase before its detected as a press. If you set it too low, the pads will react when nearby pads are pressed, and if its set too high then there won't be a reaction at all. A good starting value is to just subtract the value when pressed from the value when not pressed. Then if the input flickers or doesn't trigger you can adjust it more to get it to the right value. You can work out a reasonable threshold by just getting the difference between one of the pads at rest, and when it is touched.
Crazy Guitar Neck Inputs
The Crazy Guitar is a 3rd party guitar hero guitar, which has a similar neck pinout to the GH5 necks. For the Pi Pico, you can select your SCL and SDA pins here. You can also pick if you want the Slider to map to standard frets, or if you want to disable the normal frets because you have hardwired them. You can also disable the slider outright here as well.
DJ Hero Turntable Inputs
The platter from the DJ Hero Turntable is its own device, and this allows for configuring inputs from it. Note that when this is added, you will not see any data from it until you hit save. For the Pi Pico, you can pick your SDA and SCL pins here. You can disable an input here if you don't want it to function. This can be used to disable buttons that you do not want to use, for example if you have disconnected the joystick on a wiitar, you can disable it here so that it doesn't send phantom inputs.
Turntable Poll Rate
The Turntable Poll Rate is important, as the turntable works like a mouse, and sends a difference between the current position and the position during the last poll. By default, the console uses a poll rate of 10ms, as this gives you a bigger range of values. A fast poll rate will respond quick, but it won't have much range, which means the console won't be able to differenciate multiple speeds, as there won't be a difference in values between a slow spin and a fast spin. A slower poll rate meanwhile will give you a higher range of values, as the controller will actually see a difference in rotation between subsequent polls. Note that this poll rate also affects the buttons however, but if you want to poll them at a different rate, you can use the Peripheral feature to do this.
Turntable Smoothing
The turntable smoothing option exists as the DJ Hero turntable is very noisy, and in some instances this may not be desireable. Anything that expects a real turntable however, such as DJ Hero itself is designed to filter this out, and thus it will actually misbehave if smoothing is enabled, so this is best left disabled unless you have a reason to enable it.
Dual Turntables
The tool is flexible enough that you can design custom controllers such as dual turntables that combine the inputs from a left and right turntable. Instead of using the combined turntable inputs, you can add each input manually. If you then map both sets of inputs to the left turntable, both sets of inputs will be accepted by the game as the left turntable, and you can play in a "dual turntable" mode.
LED Binding
This allows you to pick an event (such as a player led) and bind a digital output or an APA102 LED to it.
Rumble Binding
This is only really relevant for emulating actual gamepads. When you pick a pin here, the current rumble value will be sent as an analog value to that pin. This can then be fed into an LED or a motor driver.
Console Mode Binding
Normally the controller will detect the console its plugged into, and go into the right mode for that console. However, you may want to force a specific mode, for example you may want to use a console mode on PC for an emulator. This will allow you to set an input, and then if that input is held on startup, the controller will jump to the mode you specify.
Controller Reset
When you specify an input here, the controller will reset itself. This can help if something goes wrong with authentication.
Bluetooth Inputs (Pi Pico W only)
Follow the bluetooth guide for more information about this setting.
Types of inputs
Digital Pins
A digital pin input is a input that is only on or off, like a button, which is wired directly to a pin on your microcontroller.
Analog Pin
An analog pin input is a input that can have a varied voltage, like a joystick, and is wired directly to a pin on your microcontroller.
Shortcuts
A shortcut allows for combining multiple inputs. This allows for doing things like mapping a combination of start and select to the home button. Shortcuts will automatically override standard inputs, so you can still have a normal start and select input.
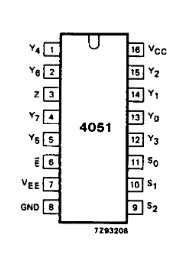
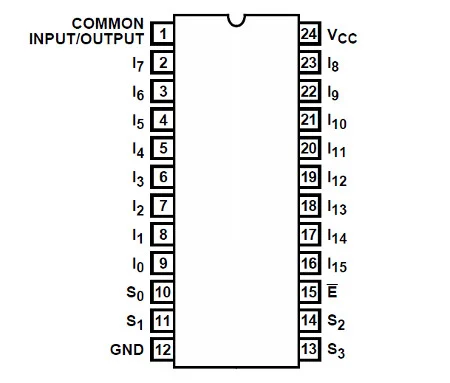
Multiplexer Input
A multiplexer allows for putting multiple analog inputs on a single analog pin on your microcontroller. This is mostly useful for the Pi Pico, which only has three analog pins. We currently support 4051 and 4067 based multiplexers. These are 8 and 16 channel multiplexers, which combine 8 or 16 analog inputs to a single analog pin. For a multiplexer, the microcontroller has 3 outputs (or 4 for the 4067) which are driven either high or low to select which channel is being read. These are the inputs S0, S1, S2 and S3 (for the 4067). In some datasheets, these pins will be labelled A, B, C and D instead. The other pins are then your inputs, and the channel you select in your input is the input that will be read.
Constant Input
Sometimes, you may want the console to always see a specific value when it polls your controller. This can be useful for things like the effects potentiometer on Rock Band guitars, where you may want the console to always use a specific effect, even if you don't actually have a effects pot wired up.
Device Inputs
Note that Wii Extension, PS2 Controllers, USB Host, GHWT Necks, GH5 Necks and Crazy Guitar necks also appear in the input type list. This allows for creating custom mappings utilising these controllers.